Beauty Note: What Is Strobing?

Attention all beauty gurus. Contouring is out and a new makeup trick is in… and it’s called strobing. While I’m not entirely ready to throw out my contouring routine, I’ve been curious about this growing trend. So, what is strobing? Strobing is all about creating a dewy, natural looking glow. Products are used to brighten the higher features of your face instead of carving them out like you do with contouring. Think of it as a way to keep your summer glow all year round without the bronzer.

In this post, I’ll be breaking down the basics when it comes to strobing and how you can achieve a fresh glow without going overboard…

Time To Shine

The idea behind strobing is to create a polished makeup look that emanates a natural radiance. That being said, your finished product should be sans glitter and all glow. Avoid products with noticeably large flakes of glitter and opt for products that ‘illuminate’ and have a touch of ‘shimmer.’

Choosing A Highlighter

Like any other makeup product, you should keep your skin tone in mind when choosing a highlighter. While some highlighters come in a white, pearlescent shade, consider a colored highlighter. For fair skin, consider choosing a pinker highlight. For medium and dark skin, try choosing highlighters with coral or gold tones. If you have oily skin, try using a powdered highlighter. For drier skin types, try applying a cream highlighter.
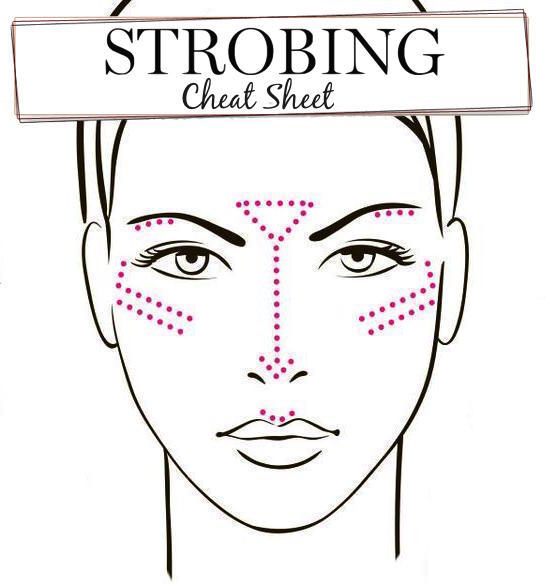
Where To Apply

It’s best to apply highlighter to the high points of your face where sunshine naturally hits. There are seven facial features you ultimately want to be highlighting: down the bridge of your nose, the center of your forehead, your brow bones, the inner corners of your eyes, your cheekbones, the tip of your chin, and your cupid’s bow (above your upper lip).

A Little Goes A Long Way

Less is more when it comes to strobing and applying highlighter. You want to give your skin luminescence without looking overly shiny or oily. If you’re nervous, start by applying a little bit at a time, gradually leading up to your desired highlight. 

59db6bf62b94125a996254945df42d92--new-makeup-trends-new-trends (2) 

 Will you be trying this new technique? 

 Let me know in the comments!

 XO Lee

Primp Tip: How to Find Your Perfect Brow Shape

Eyebrows have been a hot topic of conversation for a while now. Similar to fashion, it seems as if brow trends come and go with the seasons. When I was in high school thin, over-tweezed brows were everywhere. But now, it’s time to give the tweezers a rest! Full brows are dominating the beauty scene. And while bold is on trend, not every woman has been blessed in this department. Rather than force an unnatural shape, this post is all about learning how to enhance your natural eyebrows with minimal tools (and less plucking!). Let’s get to it…

Locating The Start And Endpoints

Begin by lining up your tweezers along the side of your nose. By doing this you should be able to see that the front of your brows should align with the upper bridge of your nose. After you do this, very minimal tweezing between your brows should be done to prevent your eyebrows from looking too far apart. My advice is to just get rid of stray hairs and nothing more.

To locate the end of your brows, align your tweezers with the outer corner of your eyes. Where your tweezers meet your brow bone is ideally where your eyebrows should end. Remember that everyone’s brows are different! Not all brows will extend to the outer corner of the eye and some will reach past this point. Similar to grooming the start of your brows, you don’t want to over-tweeze the end of your brows either. You just want to clean up stray hairs here and there.

Defining The Arch

The easiest way to define your arch is by using a white eyeliner pencil. Using a white eyeliner pencil will help you locate stray hairs that fall outside of your defined eyebrow shape. Draw a line tracing the bottom of your eyebrow. You should be following the natural arch of your eyebrow for this step, not creating a new one. Once you’ve drawn the line, tweeze whatever stray hairs fall below it.

My last bit of advice for defining your brows is to trim them. To do this, use an eyebrow spooly and comb those brows upwards. Take eyebrow scissors and trim any hairs that are longer than your actual brow shape. This step helps maintain your shape more than just using products alone.

Brow Sculpting 101

Now that you’ve enhanced the natural shape of your brows, it’s time to help them out a bit. If you’re more of a natural girl when it comes to makeup, brow gels are going to be your best friend. Clear gels will help keep your brows sculpted all day long without having to fill them in. If you have sparse brows I recommend trying your hand at brow pencils, powders or colored gels.

While drama isn’t necessarily a bad thing, remember to keep it natural when filling in your brows. Start by filling in the arches, using strokes that mimic the direction of your natural hair growth. Then, follow your arches to fill in the end of your eyebrows. Use longer strokes here but don’t go too far past the ends.

Lastly, use smaller strokes to fill in the starting points of your eyebrows. This area is where you should be filling in your brows the least. Like I mentioned earlier, use strokes that mimic your actual hairs as to avoid any over-filling. As a finishing touch, use a spooly to blend the product into your brows for the most natural effect.

Like anything else in life, practice makes perfect. If you’re still unsure about grooming your brows, here’s how to decide whether to wax, thread or tweeze. I hope this helps any brow debacles that you might be having!

Perfect-Brows

What tips and tricks do you have when it comes to brows? 

I’d love to hear your suggestions in the comments.

XO Lee

Shop This Story…

This slideshow requires JavaScript.


Raising Brows: Wax, Thread, or Tweeze?

Eyebrows are one of the most important features that you can control on your face. With that being said, proper upkeep is essential. Many people ask me how I maintain my brows and which method I prefer: waxing, threading, or tweezing. All of these are great options and some techniques work better for some and not others. To simplify your life, I’ve put together the following quickie guide to help you decipher which means of brow grooming is best for you…

If you have sensitive skin…

Thread! Threading uses a string to remove hair and is a great option for those of you with delicate skin (or even Rosacea). While waxing tugs at the skin, threading barely has any contact with your skin so it doesn’t lead to irritation. Additionally, threading doesn’t remove the top layer of skin like waxing does so your makeup will stick to your skin properly and it won’t lead to irritation if you’re using a topical prescription cream either.

If you have coarse hair…

Wax! If you have thicker hair that grows back quickly, waxing is definitely the best option for you. Not only do most people see thinner, softer regrowth, they can also go longer in between waxes since the results are fairly long lasting. There are a few drawbacks though: 1. It can be expensive, 2. It can irritate skin (but the irritation typically goes away after a few hours), 3. It can remove tiny (virtually invisible) hairs on your face that help makeup stay in place.

If you don’t want to break the bank…

Tweeze! Not only does tweezing give you a lot more control, it’s also the most inexpensive way to maintain your brows. The most important thing to remember when plucking is to exercise restraint. Yes, you may want to pluck regrowth everyday, but be careful not to take it too far.

At the end of the day, the best recommendation I can make to you is to experiment with all three methods. Everyone’s body reacts differently to things so it’s important to see what works best for you. You may have coarse hair and find that you love the results threading yields. Or you may prefer waxing… Personally, I would love to wax my brows, but when I do I tend to breakout and get red around that area. Plus, the pain is too much for me. My go-to options are tweezing or threading. But like it said, road test a few methods and see what you like best.

Which method do you prefer and why?

XO Lee

Primp Tip: My 5-Minute Makeup Routine

We all have mornings where we’re strapped for time yet still need to look presentable. Trust me when I say I’ve been there! Your alarm clock doesn’t go off, you’ve pressed snooze one too many times, or your morning just isn’t going quite the way you want it to. With a busy schedule and hardly enough time to make breakfast, putting on a full face of makeup doesn’t always make sense.

I’ve had my fair share of practice over the years when it comes to applying makeup in a pinch. So today I thought I’d share my foolproof 5-minute makeup routine to save you time on those busy mornings. Keep scrolling to see how you too can achieve a perfectly put together look in no time at all…

769687a7992730a275fba56b91725510

Start at the foundation.

On busy mornings I opt for lighter but even-looking coverage when it comes to foundation. I want my skin to have a healthy, even glow without going over the top. For this I use Black Radiance TRUE COMPLEXIONâ„¢ BB CREAM or I use Iman Second To None Stick Foundation/ Iman Second To None Cream To Powder. I love how blendable their foundation is and the end result feels completely weightless.

Once my foundation is evenly applied, I reach for my NARS Radiant Creamy Concealer, Too Faced Born This Way Concealer Naturally Radiant Concealer-Deep with Golden Undertones or FENTY BEAUTY by Rihanna Match Stix Trio. I like to cover any noticeable redness or dark circles under my eyes, but make sure to do the bare minimum. Next, I use TRUE COMPLEXION™ SOFT FOCUS FINISHING POWDER to give me an airbrush flawless finish look. Remember, we’re trying to save as much time as possible. Save any major contouring for another day! 

SHOP THIS STORY

Make me blush.

Don’t forget to leave the house with a pretty, natural flush. I like to lightly contour my cheeks by applying Anastasia Beverly Hills Bronzing Powder in Mahogany. I rarely contour my entire face so just a touch of bronzing powder does the trick.

I then apply PÜR 4-In-1 Blush Book to the apples of my cheeks. It adds enough color to give me a healthy glow without being over the top.

SHOP THIS STORY

Easy on the eyes.

Believe it or not there are only four products that I use on my eyes on a regular basis—whether I’m trying to save time or not! First I start by sculpting my brows. I’m more of a natural girl myself, especially in the brow department. I use the Tinted Brow Gel – Granite to keep my brows put and the Anastasia Brow Definer – Dark Brown to make my brows look defined. I pencil in my eyebrows mimicking the natural direction of the hair and use the spooli on the other end to blend it all out.

Sometimes, I go in with my Morphe 25A COPPER SPICE EYESHADOW PALETTE, ABH
Modern Renaissance Palette, ABH Soft Glam Eyeshadow Palette Once, and/or ABH Norvina Eyeshadow Palette. When I’m done putting on eyeshadow, I coat my eyelashes with Benefit Cosmetics Roller Lash Curling & Lifting Mascara and call it good!

SHOP THIS STORY

This slideshow requires JavaScript.

The perfect pout.

Perfectly applying lip liner and lipstick (don’t get any on your teeth!) can take up way too much time. Instead, using a tinted lip balm will not only give your lips hydration but will also give them a nice, natural wash of color that is perfect for school, appointments or work. Before I head out the door I swipe on Maybelline New York Baby Lips Cherry Balm or FENTY BEAUTY by Rihanna Gloss Bomb Universal Lip Luminizer for moisture. It leaves my lips extra soft. 

SHOP THIS STORY

And there you have it! With enough practice you’ll have this routine down in five minutes flat.

How do you save time in the morning?

I’d love to hear your tips in the comments!

XO Lee