The Celebrity DIY Facial That Will Cost You Less Than $1

The facial in question is an ice bath β€“ yes, we’re serious! We’ve got to admit we were a little shocked when we heard just how many celebs do this before a big event. But seeing as it’s definitely the cheapest of all the celebrity facial trends, we thought we should look into it. And let us tell you the benefits are MAJOR. Just take a look at the Victoria’s Secret Angels to see the results, because word on the street is they all gave themselves an ice bath before the big show. This slightly crazy facial gives your skin an instant glow, shrinks the size of your pores, and tones your skin. Honestly, the next time you’re getting ready for an event and you want to look snatched AF, do this before you start your skin and beauty prep.

So how exactly does it work?

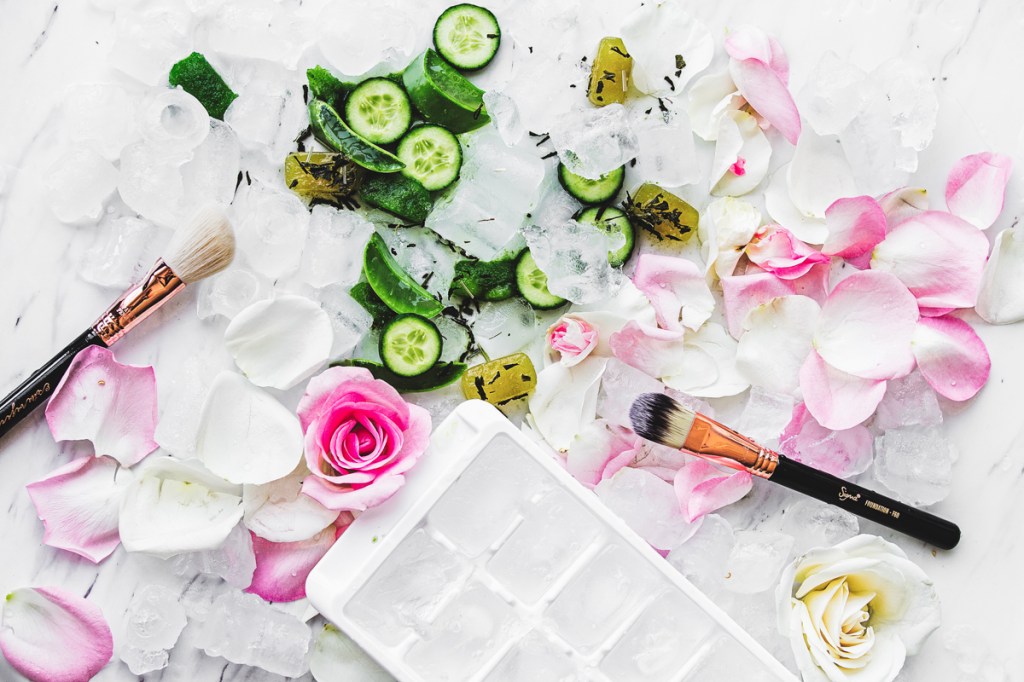
All you have to do is fill a large bowl with ice and then add enough water so that all of the cubes are submerged. Then scoop the water into your hands and splash it onto your face for 30 seconds. We swear this feels harsher on your hands than it does on your face β€“ it’s actually SO refreshing. The cool water constricts the skin’s circulation by reducing the natural heat in the skin, which instantly tightens your pores, reduces any puffiness, and revitalizes your skin.  It’ll also appear to smooth fine lines and wrinkles while making your skin look more firm. But we wouldn’t recommend giving yourself an ice bath every day (tempting, we know!), as it’s such a powerful treatment it could actually damage the capillaries if it’s done too frequently. We’d suggest it just for special occasions and events, or if you’re doing a runway show!

Ice Cube DIY

For those of you not quite brave enough to give yourself an ice facial just yet, then this ice cube DIY is an ideal alternative. All you have to do whisk together 3 tablespoons of honey and 3 tablespoons of olive oil, and then pour the mixture into an ice cube tray and freeze overnight. In the morning, massage the ice cubes onto your face until they dissolve and then wash your face with cool water β€“ this will give intense hydration, toning, and nourishment.

Another super easy ice cube DIY is to simply add a drop of your favorite essential oil into each ice cube before you freeze it. You can then use these ice cubes individually or as part of your larger ice bath facial.

Let us know if you’re brave enough to try it in the comments below!

HOW TO DIY THE PERFECT AT-HOME PEDICURE IN 10 EASY STEPS

As tempting as it is to dish out money for a salon pedicure (with the soaking, foot scrubbing, massage β€” the works) it’s not always doable, especially when you already splurged on makeup in the beginning of the week and are left to question your self-control. So if you currently find yourself in a similar position and are in desperate need of a pedi, we’re here to prove that it’s possible to achieve salon-quality results pedicure in the comfort of your own home β€” for a lot less money.

STEP 1: Let Your Nail Polish Remover Do Its Thing

Completely remove any nail polish that’s still on your toenails using nail polish remover and a cotton pad. If you don’t have any leftover polish, you should still run nail polish remover over your nail to remove any excess oil.

Primp Tip: If you’re left with any weird stains or a yellow tinge (you’ll usually see this after removing darker colors, like red or black), rub cuticle oil over the surface of your nails to lighten any residue.

STEP 2: Soak Your Feet Like You’re at the Spa

Okay, before you start soaking, your first jobβ€”and this is importantβ€”is to go around your house and gather every candle you can find. Oh, and get yourself a glass of wine while you’re at it. The trick to making an at-home pedicure feel like a spa experience instead of, you know, rubbing your own feet in your too-small-for-comfort apartment is setting the ~mood~ at your makeshift pedicure station.

Once the ambiance is right, you’re ready to soak your feetβ€”which softens tough skin and cuticles (and is downright relaxing). Lennon suggests using a basin (aka a really big bowl) if you have one, but your bathtub is also a sound option. Fill ’er up with warm water and add a liberal scoop of skin-soothing bath salts (Lennon recommends CΓ΄te Re-Treat Himalayan Pink Salt Soak, but you can also try my favorite Kneipp Mineral Bath Salts or just use a cup of kosher salt). Let your feet soak for a few minutes before moving to the next step. This is a great opportunity to multitask and try out that new face mask.

STEP 3: Get Rid of Dead Skin

After drying off your feet, use a foot file to remove any dead skin from callused (hard) areas. Parts to pay attention to are the balls of your feet, the sides of your feet and your heels. Scrape these areas until they feel smooth, but don’t overdo it. Try a pumice stone or foot file to gently smooth the skin. Then, switch your feet and repeat.

STEP 4: File and Shape Your Nails

Use a nail trimmer to achieve the length and shape you want (we recommend trimming nails straight across). Follow by filing the corners of your nails and buffing to make them smooth. According to Hadley, a big mistake people make at this point in the process is cutting their cuticles. β€œTrimming or cutting cuticles during a manicure or pedicure is purely cosmetic and sometimes it doesn’t benefit the nail in any way,” she explains. β€œThe cuticle is a barrier to protect your surrounding skin and protect against infection.”

STEP 5: Apply Cuticle Oil

Apply cuticle oil to the base of your nail. Cuticle oil doesn’t just keep your feet soft and moisturized, but it also keeps your polish from chipping.

STEP 6: Moisturize

Take both feet out of the tub and dry them off with a towel. With a foot cream or body lotion, begin massaging your toes, feet, and calves until, well, you wanna stop. Moisturize your feet with an unscented lotion. β€œScented lotions with synthetic fragrances can cause your nail polish to crack.”

STEP 7: Prep Your Toes

Use toe separators (you can buy a 12-pack for cheap online) to make painting your toes easier and avoid making a mess.

If you don’t have toe separators, Lennon suggests tearing off a piece of paper towel, rolling or twisting it into a rope, and weaving it through your toes to prevent the polish from smudging.

STEP 8: Apply Your Base Coat

Then, apply a thin layer of base coat on each nail. Follow with two thin coats of your color of choice, letting the paint dry for a few minutes between each coat.

STEP 9: Finally, Do the Damn Thing

Paint on your base coat and wait at least two minutes to ensure it’s dry. Don’t forget your base coat because it gives your nail polish something to sink into besides your actual nails.

STEP 10: Finish With a Quick-Drying Top Coat

Finish with a top coat so your nails maintain high shine and luster. Because nail polish takes about 12 hours to harden.

Primp Tip: Recommends sticking your finished toenails into cold water for a few minutes to make your nail polish harden faster and help it solidify.

Tell me: Do you do your own nails?


Tone It Up: DIY Avocado Hair and Face Mask

Love reading articles from, Tone It Up! We’ll be sharing Tone It Up’s best fitness and healthy living tips. In today’s, Serena and Katrina will be showing you how to add shine to your hair and a glow to your skin with two of their favorite DIY mask recipes:

Hi everyone, it’s Katrina and Serena here from Tone It Up! Today we’re excited to be telling you about two DIY masks you can make for your hair and face. They are both so easy to make and for when you are in the mood for a relaxing evening at home. Plus, they will freshen up your pretty locks and clear your beautiful skin! The key ingredients in both of these masks are avocado and apple cider vinegar, both of which will make your hair shiny and soft and add a glow to your skin.

Here’s how to make them (be sure to pin the image below to remember it for later!)…

To recap, here’s how to make these masks:

Avocado Hair Mask

You will need:

  • 1 banana
  • 1 ripe avocado
  • 1 tsp olive oil

Instructions:

  1. Blend all the ingredients together and massage into your hair from roots to ends, covering thoroughly.
  2. Let sit for 30 minutes.
  3. Shampoo well, then rinse with apple cider vinegar.


Avocado Face Mask

You will need:

  • Β½ ripe avocado
  • 1 tbsp of honey
  • 1 tsp of apple cider vinegar

Instructions:

  1. Blend the ingredients together or mash in a bowl.
  2. Apply to your face and leave on for 15 minutes. Focus on your breathing and relax while letting it set.
  3. Rinse off with cool water and a damp cloth.

We love the avocado in these masks because it helps to moisturize and rejuvenate your hair and skin. The healthy fats act as an all-natural and super hydrating moisturizer. And let’s not forget about the apple cider vinegar (one of our favorite elixirs). You might remember us talking about the benefits of apple cider vinegar here on BeautyLeeBar.com couple weeks ago. Not only is it good for your body, it’s great for your hair. It closes the cuticles, allowing your locks to lay flat for shinier hair that’s easy to style. It also acts as an astringent that clears your skin as well.

Now that you’ve read a bit about two of our favorite masks, we want to know…

Will you give our DIY avocado hair and face masks a try?

Let us know how they work for you in the comments below! And don’t forget to pin the image above so you will have it for later πŸ™‚

XO Team BLB

P.S. If you liked this post, be sure to check out last week guest blog about apple cider vinegar by clicking here.

Fenty’s New Bronzer Just Stepped Up The Game (And Our Makeup)

Ever since Pon De Replay blasted through our old school boombox nearly 15 years ago, we’ve been die-hard Rihanna fans. We didn’t think we could love her any more, and then she proved us wrong when she stepped on the beauty scene and MAJORLY shook sh*t up! Championing inclusivity, Rihanna’s Fenty Beauty line has products for every beauty lover, and she’s not just got every skin tone covered; whether you prefer bold af makeup vibes or natural and fresh, girl got your back.

Her latest beauty revelation is Sun Stalk’r, a bronzer that comes in eight shades, which is pretty great, considering up until recently, most bronzers came in a one-size-fits-all shade (Benefit’s Hoola now has four shades). Not only did this mean that people with deeper skin tones were almost completely excluded from the bronzer convo, but that even those with super fair skin tones would struggle to find a flattering shade. We tried the newΒ Sun Stalk’r bronzers, $30, to see if they played on our face as well as they do in theory.

What it is:Β A long-wearing, transfer-resistant pressed bronzing powder designed to β€œBring all skin tones to life with an instant sun-soaked glow.”

What it does:Β The formula was specifically designed to make bronzing foolproof – it’s buildable and transfer-proof.

What we liked: When we first applied this, our first thought was that this wasn’t a very pigmented bronzer, but by the end of application we realized why the β€˜soft pigment’ is actually amazing. How many times have you slapped on your fave bronzer only to realize you’ve got waaay too much on? Then you have to spend a good few minutes painstakingly blending it out. And that’s why this buildable formula is actually great, because it makes going overboard almost impossible.

Application tip:Β For adding all over glow, use a fluffy brush and dust your Sun Stalk’r shade across the high points of your face and around your hairline. For a bronzing, contour effect, opt for a more densely packed brush, like the new Fenty BeautyΒ Cheek-Hugging Bronzer Brush, $36, or the Real TechniquesΒ Instapop Cheek Brush, $10. But be wary; the more densely-packed the brush, the heavier the pigment.

The shade range is impressive, and there’s finally a complementary shade for fair and rich skin tones. Although we feel that the only real β€˜bronzing’ shade for deep to rich complexions is most likely going to be the deepest shade, Mocha Mami, which has red undertones that look really gorgeousΒ and add a stunning warmth to the skin. If you’ve not used bronzer before, check out Fenty’s tutorial on how to apply bronzer for deeper skin tones.

Shade-finding tip: We found that depending on how we built up these bronzers, they worked for multiple skin tones. While that means shopping online should be easier (you will probably suit a couple of shades) we recommend going into the store to find the perfect shade that can be worn lightly and built-up as there are both neutral and warm options to choose from.

The verdict: We’re impressed! We love the packaging and the fact is has a mirror inside, and we find the formula really easy to use and play with. We’re super impressed with the shade range and formula, and we’re dying over the shade names – I$land Ting, Coco Naughty, and Mocha Mami are our faves. Yet again, Rihanna nailed it.

Have you guys tried this yet? Let us know what you think in the comments below.