Beauty Debate: Should I Use Setting Powder or Setting Spray?

It seems like there’s a setting product for everything β€” whether it’s to quickly dry ourΒ nail polish, perfect our eyebrows orΒ lock-in our makeup. And while the product options for setting our look are very straightforward when it comes to nails and brows, when we’re talking about the rest of our makeup, it’s just not as easy. How do we chooseΒ between different setting powdersΒ and setting sprays, and is there even a difference between the two? Tap inΒ to find out.

The Case for Setting Powder

According to the web, setting powders are designed to absorb excess oil and moisture from your face. β€œBecause skin is a porous surface and produces oil, you want to set your face makeup with powder to help it last longer without melting away.

Because of this, setting powder is applied during your makeup routine to set foundation, concealer and any liquid or creamy products you’ve applied. Setting powder often leaves the skin with an β€˜airbrushed’ finish and can help to blend as well because it diffuses what’s under it. This is not to be confused with finishing powder, which is used after setting powder and adds even more of a blurred look to imperfections of the skin (lines under the eyes, pores, etc.) and control shine. Thus, setting powders are a great option if you have issues with creasing, cracking or excess oil throughout the day.Β 

The Case for Setting Spray

As far as setting sprays go, they’re designed to be applied after your whole makeup routine is complete. Setting spray is a fine mist which is applied after finishing the makeup routine. The setting spray can have different finishes such as matte or dewy, and it elongates the amount of time the makeup will last. It can also be used to amplify highlight or to apply a shadow damp β€” simply dust some product onto the brush and spritz the brush after.

Setting spray leaves behind a lightweight, skin-like finish but can not be absorbed into your pores like a powder can. Even mattifying sprays don’t mattify your face the way a setting powder can, in which making it a better option for those who have drier skin and need a boost of hydration.

urban decay all nighter ultra matte, dermablend loose setting powder

So, Which One Should You Use?

While powders tend to work better for oily skin and setting sprays for dry skin, if you really want to set your makeup and extend the life of your makeup, I recommend using both a loose powder and a setting spray.
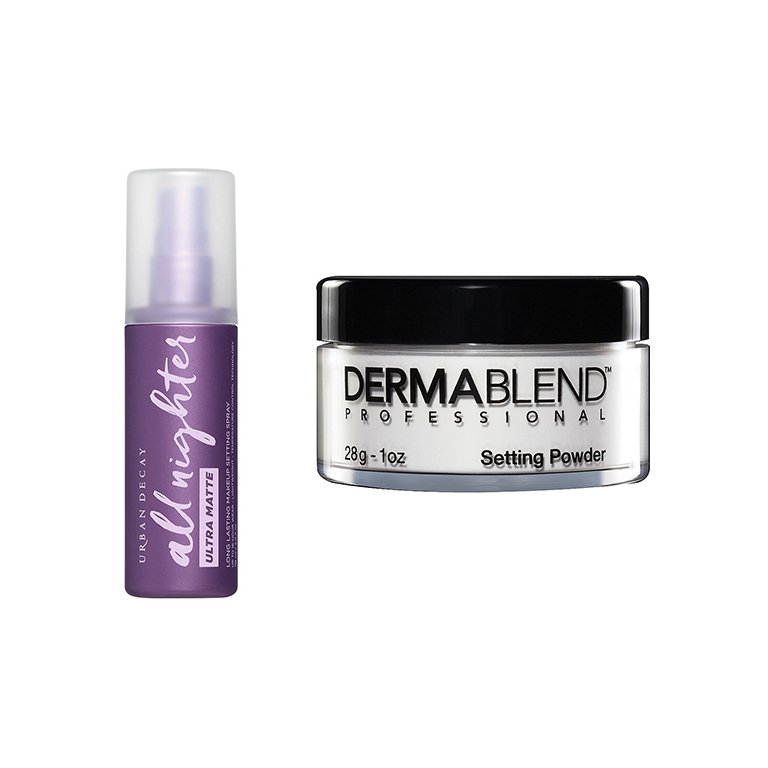
Β 
Pack on a setting powder like theΒ Dermablend Loose Setting PowderΒ to smooth your skin and finish it with a setting spray of your choice, like theΒ Urban Decay All Nighter Ultra Matte.

How to Fix Cakey Makeup Like a Pro

Your makeup can start outΒ looking as flawless as can be, and suddenly, some time around lunch, your makeup startsΒ settling into linesΒ you didn’t know you had and appears thick and cakey. Sound familiar? It’s happened to the best of us. Thankfully achieving that covetedΒ second skin lookΒ and making it last isn’t an impossible feat. Here, I will be walkingΒ everyone through my tips for avoiding and fixing cakey makeup.Β 

Step #1: Prep Your Skin and Products

Cakey makeup is most often caused by one or both of the following: not prepping the skin properly and using dirty brushes or sponges. This is why the prep you do before applying your makeup is so important. Start by cleansing your skin. Every few days, follow with an exfoliator to remove any dead skin cells or surface debris, and then finish with a moisturizer and lightweight sunscreen. A solid skincare routine will give you a fresh, smooth canvas to work with.Β 

Also recommend cleansing your makeup brushes or sponges at least once every two weeks. Clean brushes and sponges apply makeup much better.

Step #2: Apply 

A third common cause of cakey makeup? Applying too much product. Try applying foundation and lip products in thin layers so that it all sets properly without looking cakey. Another tip for a flawless application is to use liquid foundation and concealer that contain hydrating ingredients like hyaluronic acid. If using a cream formula, I’ll let it melt down a bit to a more liquid consistency before applying.

Step #3: Refresh

If you follow the steps above and your makeup still turns cakey mid-day, a quick refresh is all you need. My suggestion is spraying a beauty sponge with a hydrating face mist or setting spray (try theΒ Urban Decay Quick Fix Hydra-Charged Complexion Prep Priming Spray) and gently dabbing it over any cakey areas. This will absorb any excess product and re-blend your makeup. If the cakey-ness is primarily in the under-eye area, try removing the makeup in that area, re-hydrating, then reapplying under-eye concealer.

POSTS YOU’LL LOVE:

Dry Hand Tips

If you’re constantly washing your hands and using sanitizer around the clock, your hands are probably dry AF. While it’s important to wash your hands as often as possible, it can wreak havoc on your skin. Your skin is your body’s first defense against bacteria, so you need to ensure you keep your hands hydrated. Cracked, dry hands and damaged skin means a weakened skin barrier, which makes it easier for germs to enter.

Fortunately, we’ve got some easy solutions so you can say goodbye to dry hands, for good!

Find a Nourishing Hand Wash

Many celebrity dermatologists recommends avoiding bars of soap as they can seriously dry out your skin. They explains, β€œSoaps have a special molecule that finds oils and strips them from the skin. We need our natural oils for retaining moisture.” Therefore, trade-in your traditional soaps for a nourishing hand wash instead. We’re currently using the Bath & Body Works Gentle Foaming Hand Soaps, $8.50, as they’re infused with essential oils, as well as vitamin E to nourish and clean the skin. Plus, they foam into a rich lather that smells so good – it makes washing your hands feel luxurious! Another hydrating soap that’s a little more boujee is the Aesop Resurrection Aromatique Hand Wash, $52. The formula boasts orange, rosemary, and lavender essential oils to cleanse and restore the skin.

If you already have a liquid handwash, you can try adding in a tablespoon of coconut, olive or grapeseed oil, which will help to lock in moisture while you wash. After you wash your hands, try to follow with a moisturizer almost immediately.

Posts You’ll Love:

Use Oils

If you don’t have any hand creams use oil instead and massage it into your hands. Our favorite oil to use is extra virgin olive oil, a recommendation we got from Julia Roberts. It’s super-hydrating and packed with vitamins, antioxidants, and fatty acids that help hydrate while repairing damaged skin. It’s also suitable for all skin types and is anti-microbial. If you don’t have olive oil in your cabinet, you can use coconut oil (our go-to DIY oil), or any other oil.

If your hands are super dry, create a DIY hand mask by massaging oil into your hands, then put on a pair of plastic gloves. If you don’t have gloves, you can wrap your hands in clingwrap. Try to leave them covered for up to an hour for super soft, hydrated skin.

Apply a Rich Cream or Balm

As you can probably guess, applying hand cream RN is essential. In fact, we’ve gotten into the routine of applying lotion immediately after we use hand sanitizer. You can also keep hand cream next to your sink for easy access after hand washing.

Look for a hand moisturizer that contains rich, hydrating ingredients like shea butter and oils like apricot and avocado oil, as they’re packed with natural goodness that will help seal in moisture and repair the skin. Here are three of our faves:

soft hands

Vaseline Intensive Care Lotion, $16.26: While this may not be the most luxe hand cream on our list, it’s a household staple. The fast-absorbing formula is clinically proven to heal dry skin within five days. Plus, it doesn’t leave your skin feeling greasy or tacky.

L’Occitaine Honey Harvest Hand Cream, $29: This hand cream leaves our skin feeling so smooth! The rich combination of shea butter and honey hydrates while strengthening the skin, helping prevent future moisture loss.

Kiehl’s Ultimate Strength Hand Salve, $28: This cream is infused with sesame oil, avocado oil, and olive, which are all packed with essential fatty acids to nourish and repair dry skin.

Check out more of our all-time fave hand creams here.

What’s your fave hand cream? Let us know in the comments below.

10 EYESHADOW TIPS EVERYONE SHOULD KNOW

Your eyes are arguably one of your strongest assets. They are the so-called windows to your soul after all, which is all the more reason to brush up on your eyeshadow skills. But applying eyeshadow like a pro can be tricky. What are all those different sections of a palette for? What type of brush should you use? Let’s go back to the basics. Ahead, find our ten golden rules for applying eyeshadow and you’ll be golden, too.

STEP #1: Always Use Primer 

An eyeshadow primer creates a clean canvas for you to work with, and it acts as a barrier between your eyeshadow and the natural oils in your skin. That way, your makeup stays put so you can keep touch-ups to a minimum. Try a formula like Urban Decay Eyeshadow Potion Primer.

STEP #2: Enhance Your Natural Eye Color 

You want to choose an eyeshadow shade that accentuates your natural eye color. Finding colors that best complement your eyes takes some experimenting, but here’s a good place to start:

Blue Eyes: Shadows with bronze or peachy tones help blue eyes pop. Slate gray is another great option.

Green Eyes:A plum-colored shadow looks very flattering if you have green or hazel eyes. Rusty shades are also gorgeous.

Brown Eyes:If you’re a brown-eyed girl like me, we’re lucky because most shades look great on us. But gold or purple hues are especially flattering

STEP #3: Know Your Eye Shape 

Do you have deep-set eyes? Close-set? Hooded? Determining the shape of your eye helps you decide which shading technique is right for your specific features and plays up your natural beauty.

STEP #4: Decode Your Palette

You might be tempted to open an eyeshadow palette and just have at it, but it’s important to know which sections correspond to each part of your eye. Trust us, there’s a method to all this palette madness! There’s a variety of palettes out there, but here’s a general breakdown of your basic eyeshadow quad palette (the NYX Professional Makeup Ultimate Eyeshadow Palette in Warm Neutrals is a great one to start with). 

Lightest color: This is your base color. Apply this shade from your upper lash line all the way up to right beneath your brow. You can also use this color in the inner corner of your eye to add a bit of brightness.

Second lightest: This is your lid color, as it’s slightly darker than the base. Brush this over your lid from your upper lash line to your crease.

Second darkest: This is applied to the crease for a contouring effect. This should go over the area where your brow bone meets your lid to create definition.

Darkest color: Finally, the liner. Using an angled brush, apply it to your upper lash line (and lower lash line if you want a bold boost), making sure to brush where the root of your lashes meets your lid so there’s no visible gap.

STEP #5: Blend, Blend, Blend

We can’t stress this one enough! Blending your edges can be the difference between your eyeshadow looking flawless and looking like … well, a hot mess. Don’t smear. Use a light touch and gently sweep your brush along your lid, blending harsh lines. To blend like a pro, you need the right brushes, which brings us to step #6.

STEP #6: Invest in the Right Brushes

There are so many eyeshadow brushes out there in every shape and size, it can get confusing. Here are the three most important ones you should own:

Basic eyeshadow brush:The bristles are flat and stiff, and you use this for all-over color.

Blending brush:The bristles are soft and fluffier for seamless blending.

Angled eyeshadow brush:This is a precision brush that is perfect for lining your eyes.

STEP #7: Take Care of Your Tools

Cleaning your eyeshadow brushes is probably at the bottom of your to-do list, but it’s really important. We’re talking about your eyes here, so cleanliness is key. Run your brush under lukewarm water and then pour a nickel-sized amount of baby shampoo into your hand. Swirl the brush in the shampoo, rinse well and pat dry with a clean cloth.

STEP #8: Choose Your Formula Wisely

Pressed eyeshadows are your basic, most common formula. They’re a great, mess-free option. Cream shadows are perfect if you want a dewy sheen, but they can crease easily β€” especially if you have oily lids. Loose shadows usually come in a small pot, and while you’ll feel like a professional makeup artist using them, they are definitely the messiest of the three.

STEP # 9: Let a Bold Eye Shine 

A smoky eyeshadow looks gorgeous on its own, but once you add a dramatic lip into the mix, the two can overwhelm each other. Don’t be afraid to go bold, but just make sure your overall look has balance.

STEP 10: Keep it All in Place With a Setting Spray 

Get the most mileage out of your makeup by using a setting spray as your final step. Hold the bottle at arm’s length from your face and spritz away. We love the Urban Decay All Nighter Ultra Matte Setting Spray.

Read More: