Falsies are a girl’s best friend — bring on the volume and length. But if sticky eyelash glue gets stuck to your real lashes, it’s game over. The buildup and tackiness can make reapplication nearly impossible and cause unwanted irritation. To ensure that our false lashes can be used more than once and our real lashes stay healthy, it’s important to keep ’em clean. For some advice on the best way to do so, scroll down and enjoy!
Tip #1: Use Less Glue From the Start
To prevent a buildup of gunk and glue on your lashes at the end of the day, try to use as little glue as possible during application. My best tip is not to apply too much glue on the false lash to begin with. Think you may have gone too heavy with your glue? Recommended wiping it off and starting from scratch. Not only will this make it easier for you to take off your falsies at the end of the day, but it’s also a way to ensure that too much glue doesn’t get on or around your eyes.
PRIMP TIP: Apply Lash Couture Strip Lash Adhesive on the eyelids like an eyeliner then apply your favorite pair of lashes. Its easier and quicker to apply the lashes plus it is just less messier overall. Lee wished she came up with this brilliant beauty trick but she actually received it from Raye Boyce.
Tip #2: Don’t Pull Them Off
Time to take off your lashes for the day? Don’t start pulling them off, tugging or scrubbing. You won’t get all the glue off your lashes, and you risk getting glue in your eyes. What’s worse? You’re going to end up ripping your own lashes.
Tip #3: Use a Gentle Eye Makeup Cleanser
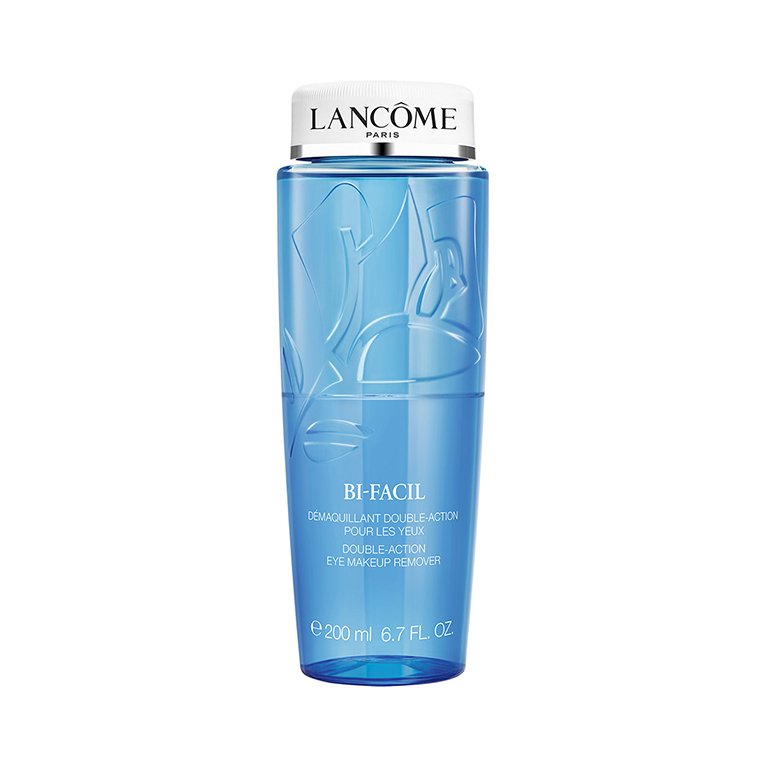
Instead, to get your fake lashes and glue off cleanly, Lee recommends using a soft and gentle eye makeup remover. For years I’ve been using the Lancôme Bi Facil Double Action Eye Makeup Remover; it’s the best for getting rid of lash glue. Just pour some onto a cotton pad and dab it over your lashes until the strip falls off cleanly. Plus, you can also use the product to clean glue off your falsies so they’re good as new for reapplication.
OK, so you’ve probably cleaned and sanitized every square inch of your living space lately in an effort to keep your home germ free, but have you thought about your makeup products? We’ve all read about how important it is to clean makeup brushes and sponges on a regular basis, but your eyeliner pencils, powder compacts and palettes need love, too. Ahead, we chatted with makeup artist Frankie Padron about the best methods for sanitizing your products and how to do so at home.
Why Sanitize Your Makeup Products?
There are plenty of reasons why you should sanitize your makeup products in addition to your brushes, says Padron. For one, if you are sharing products in your collection with others, you want to make sure they’re clean. “I sanitize after every person because I’m using makeup on different people daily,” she says. Another reason to sanitize your products is if you’re prone to acne and breakouts. “If you have a breakout, I recommend cleaning your tools after every use so you avoid spreading bacteria.”
How to Sanitize Makeup Products
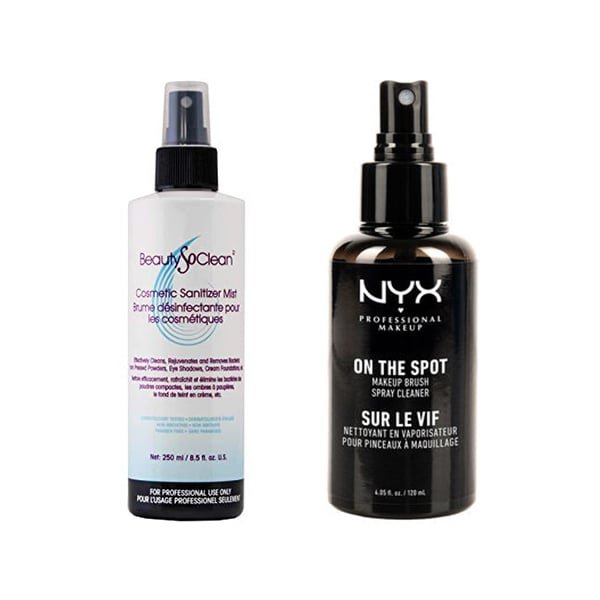
According to Padron, a cosmetic sanitizer mist is a must-have for cleaning your makeup powder and cream products like eyeshadows and face palettes. She recommends using the Beauty So Clean Cosmetic Sanitizer Mist which comes in a no-mess spray bottle that can be distributed on any product.
“I would avoid using any products that have a high concentration of alcohol in them, as this may dry out your makeup.Frankie Padron, MUA
As far as pencil products are concerned, Padron takes a slightly different approach. “For eyeliner and lip pencils, I sharpen them before it touches anyone, making sure I shaved off the area I used on someone previously,” she says. This works the same for any lip liners or eyeliners you use on yourself if you feel like you need a fresh tip before application.
Padron notes that when picking your makeup sanitizing products, make sure to read the label. “I would avoid using any products that have a high concentration of alcohol in them, as this may dry out your makeup.” While brushes and sponges have a reputation for holding and spreading bacteria, it is important to give your powders, palettes and creams a little cleaning, too.
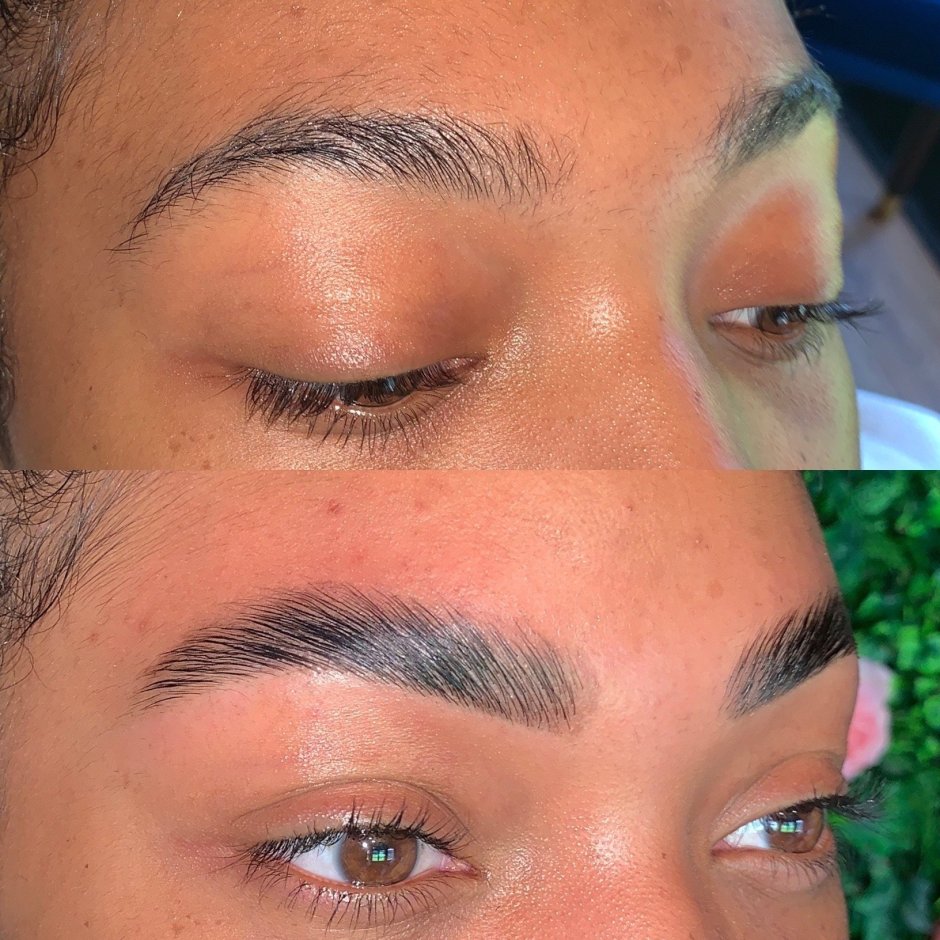
If you rewind to 2018, the world was obsessed with perfectly sculpted, HD brows. Two years later, that trend has officially died (RIP) and in its place is the boy brow. It’s equally bold yet more natural, fluffy, and (looks) untouched – we’re low key obsessed.
The bad news? Not everyone is #blessed with naturally thick, fluffy brows. The good news? You can fake it with brow lamination; a semi-permanent brow treatment that straightens, sets, and tints your brow hair leaving you with full, thick brows for up to eight weeks. Brow lamination, as it’s called, is like a perm for your eyebrow hairs.
Originating in Russia, but blowing up in England and US, brow lamination tames unruly hairs and sets them in place for a fluffy just-combed look. Brow lamination is essentially a perm for your eyebrows, but without using the same harsh chemicals. It’s a keratin treatment that not only stimulates growth while strengthening the brow hairs, but creates thick, fluffy, and full brows.
Lamination is a good alternative to microblading because it works with your existing hair, giving you your ideal brow look without the use of needles, ink insertion into the body, and pain.
Here’s everything you need to know:
What Is Brow Lamination?
According to Instagram, brow lamination is a chemical process that straightens the eyebrow. It’s very similar to a lash lift, but what it does is straighten the brow in a vertical and swept way that lasts for five to eight weeks.
Brow lamination is the latest brow treatment to blow up on Instagram and the results really do look amazing. The treatment reworks and tints your natural brow hairs to create a fuller shape. This treatment will help give you a uniform, full brow shape. This treatment is perfect for “Eyebrows that do not have symmetry: where the hairs follow a different pattern.”
Lamination is different than micro-feathering, for example, because it’s about texture, not color. “Most brow treatments are meant to fill in the brows and add darkness and pigment and can mimic the look of the hair.” Lamination, on the other hand, is a perm for the brow hairs.
To achieve this naturally full effect, brows are brushed into place in a way where every hair follows the same direction of growth. Then brush into a shape to create a very soft, natural arch. Brow Lamination is for nearly all skin types; however, a patch test is always carried out before the treatment to ensure no irritation or reaction occurs.
The entire lamination process is 30 minutes from start to finish. “A chemical solution is applied to the brow that breaks down the bonds in the hair to straighten it. After that, a neutralizer is applied to reform the bonds to create the new shape. Then, a post-treatment oil is applied to nourish the hair. This process should be done before brow tinting and before brow shaping.
Once the treatment is complete, brows will look very sleek with a wet look. This wet look lasts for 24 hours and once washed will remain fluffy. If you want that glossy look, you can achieve it easily by applying a brow gel or serum.
Post service, avoid hot showers and don’t exercise for 24 hours in order to keep them dry. After the initial 24 hours, you can wet and cleanse the face with any of your favorite products, which wouldn’t disrupt the shape of the brow.
Overall, thicker hair can endure more treatments every six weeks, but with finer brow hairs, it’s recommended they wait at least ten weeks because it can be damaging to the brow hair. If you want to get the look without the laminating process, try the NYX Professional Makeup Fill & Fluff Eyebrow Pomade Pencil to lift your natural brows with makeup.
How Long and How Much Does Brow Lamination Cost
With proper care, brow lamination can last four to eight weeks. Many Brow Experts recommend castor oil, as it helps boost hair growth: simply apply a coating of castor oil using a Q-tip before your sleep. The price ranges from $50 to $300 depending on location and the artist who’s performing the treatment.
Like with any new treatment, the results may be transformative, but there’s also underlying risks. If you’re curious about brow lamination, make sure to do your research to find a skilled artist that works out of a licensed, clean salon before booking an appointment.
At this point, all beauty junkies worth their weight in mascara know their way around highlighter and can differentiate between a powder formula that packs a punch and a cream formula that adds just a little something. Every once in a while, however, a new product enters the category that causes even the most devoted and experienced to pause and investigate. Cue highlighter sprays, a new take on the (now) classic beauty product. It offers shimmer rather than glitter, and differs from pigment-infused sprays meant to be spritzed all over. Spray highlighters are meant to be applied to a concentrated area, which can be difficult to achieve at first spritz. That’s why we tapped celebrity makeup artist and brand founder Patrick Ta to share his best tips and tricks for mastering the look.
It’s All About Focus
The key to getting a lit-from-within glow is concentrating the highlighter on specific parts of the face. Ta’s Major Glow Highlighting Mist works well for this thanks to its super-fine mist, which offers sheen rather than sparkle. When applying, “make sure you target certain areas of the face,” says Ta, whose go-to spots are the tops of the cheekbone and “C” around the temple.
Distance Is Key
To ensure you don’t look like you dipped your cheek in glitter, it’s important to get the distance right. Ta recommends six inches from the face, which will ensure you’re getting the benefit of the product without overdoing it. If you do go a little overboard, however, just use a clean beauty sponge to dab away excess product.
Use Your Resources
If you need help targeting specific areas, use a sheet of paper to block off the area you want to highlight — similarly to creating a wing using a business card. This will help to keep the highlighter in one place and concentrated in the areas you want to glow. If you want to be a little fancy (and have some extra coin to spend), pick up the Patrick Ta Beauty Major Glow Setting Fan, which can be used to help place the highlighter and set the mist.
It’s Not Just For the Face
According to Ta, the best way to finish off any look is to bring the highlighter down to your neck and décollatege, which helps everything to look cohesive and blended. You can spray the highlighter directly for an extra pop of glow, or buff it in using a brush for a diffused, sun-kissed look.