Odds & Ends: 5 Amazing Uses for Coconut Oil

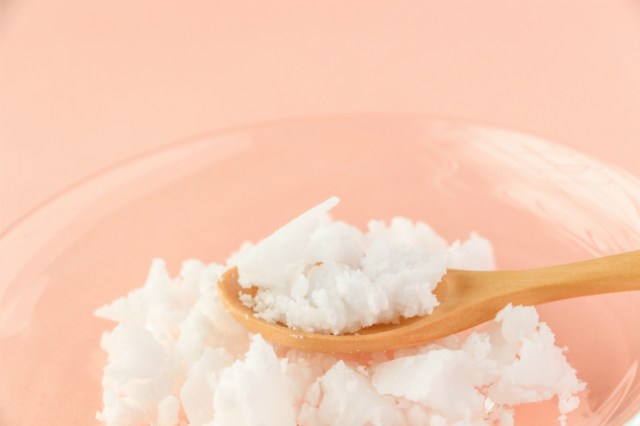
Years ago, if someone were to tell me that there was one single product that solved dozens of health and beauty woes, I most likely wouldn’t have believed them. One product that you can use to cook, moisturize your hair, remove your makeup, and hydrate your skin? Not possible, I would have thought. However, this little miracle does exist. And, unlike much fancy beauty and cooking products out there, it is free of chemicals and 100 percent natural. This wonder is none other than coconut oil.

I use coconut oil every day on my skin, my hair, and even in the kitchen. In fact, most of the time when a friend comes to me asking for a quick fix for a beauty or skin problem, my answer is “just put some coconut oil on it.” Now that you know a little bit about my obsession with coconut oil, today I’m going to share five ways you can incorporate it into your own lifestyle…

1. Face and Body Moisturizer
If you rub a little bit of coconut oil between your hands, you will immediately notice how incredibly moisturizing it feels on your skin. As a face and body moisturizer, coconut oil is much more hydrating than average store-bought lotions because the oil penetrates deep layers of the skin and actually helps to strengthen underlying tissues (
Huffington Post). It will also help remove dead skin cells, removing any rough or flaky texture from your skin’s surface and giving you a full body glow. You can use coconut oil as a moisturizer for your entire face, but I like to put it under my eyes and on my lips before bedtime. For my body, I mix equal parts coconut oil and body lotion together to create an ultra-hydrating cream, and I apply it right when I get out of the shower. You can also add essential oils like lavender or vanilla to scent your oil, but many people love the natural, tropical scent as it is. The best part about this oil is that it will absorb into your skin without feeling oily or greasy.

2. Hair Mask
Just as coconut oil works wonder for your skin, it will also give your hair a silky texture and tons of shine. I use coconut oil as a hair mask at night after I’ve washed my hair. Simply heat up about 3 to 5 tablespoons of coconut oil in the microwave, so that it’s a warm liquid. Then, after it has cooled, apply it to your hair as you would any hair mask. Put on a plastic shower cap or wrap an old T-shirt around your head, and leave the oil in while you sleep. When you wake up, wash your hair and discover your best hair day yet. You can thank me later.
Note: Unlike store-bought hair masks, coconut oil is all natural and great for your skin. So, if a little bit happens to rub off onto your pillow while you’re sleeping, you don’t have to worry about dealing with clogged pores or a breakout the next day.

3. Makeup Remover
One of my favorite uses for coconut oil that I discovered all on my own is its gentle power to remove makeup. I was applying a bit under my eyes one night before bed, and I noticed that it was easily removing some extra mascara that hadn’t washed off with my face wash. Now, before I wash my face, I use my finger to gently rub downward on my eyes and eyelashes to remove my eye makeup from the day. Tip: Leaving a little oil on the base of your eyelashes can actually help them grow a bit, so it’s ok if you don’t rinse it all completely off afterward.

4. Cooking Oil
Coconut oil is also one of the healthiest oils to use when cooking. Our favorite nutritionist
Shira Lenchewski, RD., explains that unlike animal fats, which are made up of long-chain triglycerides (LCT), coconut oil is made up of medium chain triglycerides (MCT). MCTs are metabolized more rapidly in the body than LCTs, so there’s increased fat burning potential. Many healthy oils (like olive and flax) break down into harmful compounds when heated to their “smoke-point.” But coconut oil remains stable at higher temperatures, so it’s a great option for stir-frying and pan-searing. For cooking, Shira recommends using unrefined coconut oil, also called raw or virgin.

5. Baking Ingredient
Coconut oil is a great ingredient to have in the pantry if you love baking. Shira says that because coconut oil is a saturated fat, it’s a great substitute for butter in baked goods. Saturated fats are the typical fat of choice in baking, due to their favorable effects on texture. And while saturated fats don’t have the same beneficial effect on good cholesterol as mono- and polyunsaturated oils, they do play a role in various brain and body functions, explains Shira.

Tip: Always buy unrefined, extra virgin coconut oil, since it goes through the least process and is closest to its natural state. For cooking, make sure your coconut oil indicates that it can stand high-heat, not just medium heat.

I also take a coconut oil supplement with my daily vitamins to make my hair shiny and my skin blemish-free. And I’ve been using coconut oil to experiment with oil pulling. I’ve been trying it for the past two weeks, so I’ll be sharing my results here on BeautyLeeBar.com in the coming weeks…stay tuned!

Do you have one favorite multi-purpose product you swear by?
Tell me about it in the comments below.

Xx
Team Hello Beauties

Detox Diary: My 7-Day Juice Cleanse

Hello Beauties, The first time I heard about juicing was about 2 years ago. I have tried different foods and beverages but I could never get past the tasting because the smell was just too unbearable for me. I always felt like I was going to be sick. On June 7th, I received the 7 Day Detox from Ultimate Body Tox which includes 6 flavors: Strawberry, Lemon Lime, Sweet & Sour, Peach, Mango and Sangria. I decided to take my second dive into the world of juicing by attempting a 7-day juice cleanse from Ultimate Body Tox. Throughout the cleansing process, I documented what I was feeling and going through just so I could share my experience with all of you lovely B.L.B readers. Without further ado, here is my 7-day detox diary…

what-is-itThe 7 Day Detox is to help jump-start your weight loss journey. The 7 Day Detox is either a 7 or 15 day process depending which one you end up buying. The detox is more flavorful and best consumed cold or slightly frozen so you may choose to refrigerate or freeze the 7 Day Detox drink for 30 minutes or so before consumption. NOTE: Freezing your drink is recommended but not required. 

Directions_Logo_BackType Select one bottle of 7 Day Detox and shake well ( for about 10-15 seconds) then consume the entire 8 ounce bottle. Sip it. Do NOT  drink it all at once. To speed up the detox process, consume a glass of water after drinking the 7 Day Detox ( Consuming water is optional). (4) 8oz bottles are to be taken 1 every 48hrs that equates to a 7 day master detox. You can eat while using the detox.

If your tolerance level is up and your body can handle the full 8oz bottle in 24 hours, you can move forward with taking each one every 24hrs. Shake well before each consumption and freeze for a frozen healthy detox. NOTE: It helps with bad breath, bad skin, and body odor.

Helpful_TipIt is recommended that you consume the 7 Day Detox during whatever time of day you are home with a clear schedule. The detox is deigned to flush toxins from your system, as such you will visit the restroom frequently. Do NOT lay down after you ingest the liquid into your system, it prevents it from working properly.

Pre Cleanse:

  • I stocked up on fruits, veggies, green tea, water and salad. I weaned myself off junk food and fast food for about 2 weeks to get my body and mind in order.
  • I also made sure to get 8 hours of sleep the night before I started my cleanse so I wouldn’t feel tired or groggy. 
  • I made sure to eat a balance meal and only snack on fruits.

Post Cleanse:

I felt so good after I completed my cleanse even though I couldn’t leave my house for 2 weeks. I even got my mom wanted to try it. I definitely felt cleaner, slimmer and gained a sense of accomplishment.

ultimate body

Pros & Cons:
Now that you’ve read my detox diary, here are some of the good and bad things I learned from my cleanse.

Cons:

  • Cleanses are a bit pricey. If you are trying to pinch your pennies one month, it might not be the time to splurge on a cleanse, which can range anywhere from  $30.00 – $70.00 weekly. Ultimate Body Tox is the only place I found that sells affordable products for juice cleanse.
  • Cleansing is not a solution for long-term weight loss. If you are looking to shed a few pounds permanently, then a juice cleanse is not the answer. Drinking juice all day might help you to lose some water weight, according to The Huffington Post, but you might gain those pounds back post-cleanse when your body starts retaining calories from solid food again.
  • Pain and Vomiting. The constant pain in my stomach like someone is putting needles through me or something isn’t fun at all. The puking didn’t help neither, you would had thought I was pregnant. For me, my experience was diarrhea, stomach cramps, and the feeling of pukation.

( WARNING: EVERYONE IS DIFFERENT WHICH MEANS NOT EVERYONE HAS OR WILL EXPERIENCE WHAT I HAVE EXPERIENCED. SOME PEOPLE HAD A SMOOTH SAILING WEEK. DON’T LET MY EXPERIENCE STOP YOU FROM TRYING THE 7-DAY  JUICE CLEANSE).

Pros:

  • I have never felt so hydrated! When I wasn’t drinking one of my juices, I was drinking a ton of water. I made a goal to finish a 1.5 liter bottle of water each day in order to feel full and flush out any extra toxins. This probably has a lot to do with the glow I saw in my skin the next day.
  • Cleansing gives your body a rest from digestion, according to Livestrong. Our bodies are used to breaking down and digesting food all day, every day, for years and years. So once in a while, it’s nice to give your body a break by only consuming nutrient-rich fluids. Especially if you are a junk food junkie, a cleanse will help reset your system and flush out tons of toxins. (Just make sure to eat mostly vegan in the days leading up to your cleanse or else you might be in for a pretty harsh change.)
  • Lost weight, mood was balanced, good night sleep, ate a balanced nutritionist meal, and flavor was good
  • Size. The size of the bottle was perfect especially for someone like me who gets tired of things fast. 
  • 7 Day Detox Benefits:
    Removes old waste and toxins that has accumulated on the stomach lining which prevents weight-loss
    Helps clear eczema
    Helps with bad breath
    Helps bad body odor (from the inside out)
    Improves energy

Overall, my juice cleanse was a positive experience for me and I plan on trying it again sometime soon. I think that cleansing for 7 days is plenty of time—I would not suggest doing a longer cleanse because, according to Women’s Health, your body goes into starvation mode after about 4 days. The next time I cleanse, I plan on going to a gentle yoga class or spending a few minutes in a steam room to sweat out additional toxins. But enough about me! Let’s hear what you have to say…

Have you ever tried a juice cleanse? If you have, what was your experience? If not, is it something you would be willing to try?

Leave your stories, reviews, and experiences below. I’d love to see what you guys have to say about “getting juiced!”

**FTC: This post is sponsored. Opinions are 100% my own, of course.

xx Lee

Primp Tip: Get Iced

These hot days of summer might be coming to an end, but I recently read about a pretty cool beauty tip that I wanted to share with you… The idea is to give yourself an “ice cube facial massage.”

It may not sound that particularly pleasant, but running an ice cube over your face has a lot of benefits for your skin. Besides giving your face a dewy, glowing look, the frosty cubes will help to smooth your complexion by combatting fat cells, ease wrinkles, fight acne, and promote blood circulation that will help heal blemishes.

By simply massaging your face with ice cubes for a minute or two before bed, you will essentially be giving yourself a mini facial. (Just be sure to wrap the cubes in a paper towel, or a baggie because applying them directly to your skin can cause delicate blood vessels to break.) For an added “ahh” to this spa-inspired treatment, try freezing your cubes with watermelon, lemon, or rose. Getting iced never sounded so good…

Are you going to give this cool trick a try?

If you have an out of the ordinary beauty trick that you love, share it in the comments below. I’ll feature my favorite idea in an upcoming blog post!

XO Lee

P.S. If you have any beauty questions, leave your request in the comments below…you might just see it in an upcoming blog post too!

HOW TO SURVIVE YOUR NEXT PERIOD

months

Your period. It’s scary when it comes and terrifying when it doesn’t. We know what we get to look forward to every month: bloating, cravings, fatigue, homicidal rage, and perhaps worst of all, menstrual cramps. What if I told you there were simple, at home remedies that greatly reduce symptoms of PMS? Even better, they are risk free with no side effects!

Getting your monthly bleed is the one thing that connects you to every single woman who has ever lived. Let that sink in. For hundreds of thousands of years, women have gotten their periods and they did so together. Periods were celebrated as a symbol of youth, fertility and life! It wasn’t until recent times that menstruation was seen as something to dread. What has changed? So so much, but, alas, this isn’t a lesson on female disempowerment. I am simply here to give you a crash course on how to survive your next period. So, open up that bottle of Cab and lets get to it!

To reduce cramps, you have to start early. A week before your period is due increase your water intake. The uterus is mostly composed of smooth muscle, and what happens when muscles dehydrate? They cramp! This is the number 1 tip I give to my clients and it ALWAYS works. My second big tip is to get your Omega 3’s and Calcium. I call this winning combination Nature’s Midol. You get more Calcium by eating collard greens, broccoli, spinach, kale, and you-bet-I’m-gonna-say it, CHEESE! When I say CHEESE I’m talking about organic, grass fed CHEESE. Not Kraft’s American cheese, cheese. Reach for the unprocessed stuff if you can. You can opt to get your Omega 3’s and Calcium from a supplement, but be sure to consult your doctor first!

Some MONSTERS are blessed and don’t suffer from cramps, but perhaps their problem is bloating. To minimize bloating I suggest drinking dandelion tea as it has a diuretic effect (it makes you pee.) Reducing sodium intake also does wonders. Combine these two steps and voila! Stretchy pants are now a choice, not a requirement. Tip: Mix Bigelow Green Tea with Lemon and Red Rose Tea together. Not only will it help with bloating but it also helps with cramps. Drink it during your cycle and you’ll notice that the cramps aren’t there. I find that it is best to drink it 1 week before your next period so it can start being affective right away. Plus Green tea, Red Rose Tea and lemon are good for your health and skin, so that’s a bonus!

lena-box (2)

Now, I would be remiss if I didn’t touch upon tampons. Did you know that most tampons are hybrid cotton blends (aka not cotton) that are BLEACHED and sprayed with pesticides and God knows what else? I don’t know about you but I don’t want any harsh chemicals anywhere near my hoo-hah. That’s why I encourage every woman I know to find an organic, environmentally safe tampons and pads. Beauties, I am telling you that we can save our cervixes AND our planet!

I have been seeing a lot of articles stating their opinions about the Lena Cup, and to be honest I bought one because my curiosity got the best of me. For those of you who don’t know, the Lena Cup is a reusable bell shaped cup that sits inside your vaginal canal and collects your blood. It is by far the most environmentally friendly product I have read upon on, but it requires patience and it can be a little messy at first. Once you’re in touch with your body’s rhythm and you can determine when its time to remove the cup, it will be smooth sailing. If you’re interested in the Lena Cup, I applaud you, and I suggest using it at home first for a few days before venturing out to any important events.

Directions: To use the LenaCup, some people choose to boil their cup before first use and between periods. Fill a pan with plenty of clean water. Bring to boil and let your cup float for 5-7 minutes while ensuring that the cup does not touch the bottom of the pan. You can use a pair of tongs to keep your cup in place and to remove it from the boiling water. Let your LENA Cup cool down before using it. WASH – Using warm water and mild soap wash your cup. If in a public toilet, bring a bottle of water to rinse your cup – once convenient clean thoroughly.  As always, make sure to fully read the LenaCup User Guide before use.

To recap: drink plenty of water the week leading up to your period and during. Be mindful of getting enough Omega 3’s and Calcium. Drink dandelion tea, Bigelow Green Tea and Red Rose Tea to de-bloat, decrease cramps, and reduce sodium intake. Get your hands on some organic tampons and if you’re feeling brave check out the Lena Cup! Here’s to having a happy period!

Have you tried the Lena Cup? If so, what are your thoughts on it?

Name your favorite tea and let me know how you drink your tea? (cold, hot, & etc)

( Let me know in the comments)