Broke Girl’s Guide: 10 Genius Beauty Hacks That Will Save You $$$!

If you’re anything like me, you treasure your beauty products and want to make the most of every last brush, blush, and lipstick. A smashed palette is a worthy reason for a day off work, your FAV foundations stuck at the bottom of the bottle is cause for a tantrum. Besides the fact that I love makeup, I spend good money on it too, and don’t want a single drop to go to waste. So, with that in mind, here’re 10 genius hacks that will do everything, from save your eyelashes, fix your mascara, save your smashed powders and more…

1. Get Every Last Bit of Lotion

Cut open your beauty tubes to get all your beauty product out. This works on almost ANY plastic bottle! You’ll be amazed by how much is left inside when no more will seem to come out. Scrape out the leftover product from the top half that you cut off, and put it into the bottom half. You’ll then have a huge amount of product left to use, and you can seal it up again by pushing the top half over the bottom half.

2. Salvage Broken Powders

We’ve all lived the nightmare of watching in slow mo as our fav powder or eyeshadow drops slowly to the floor and shatters into tiny little pieces.

But, there’s good news! You can save your broken powder (don’t take them traveling!) with rubbing alcohol. Add a few drops at a time until the eyeshadow turns into a thick paste, then press it down firmly with a spoon or your finger. Leave it open for the alcohol to evaporate, when it does, your powder will be good as new.

3. Save Your Foundation

You found the perfect shade, the perfect coverage, and now it’s gone, but you can still see a good few dollars of foundation left at the bottom of the glass jar. Of course, the stupid pump won’t reach it. Remove the pump, tip the foundation upside down in a re-sealable pot and leave it for a few hours. When you return, the majority of the product will be waiting in the pot for you. Still more Foundation stuck inside the bottle? Add a little moisturizer and shake, et voila… Tinted moisturizer.

4. Fix Broken Lipstick

Nothing is messier than trying to apply lipstick when it’s broken. Fix it by gently melting the broken parts, put them back together, then place it in the fridge for around an hour to seal… Lipstick fixed.

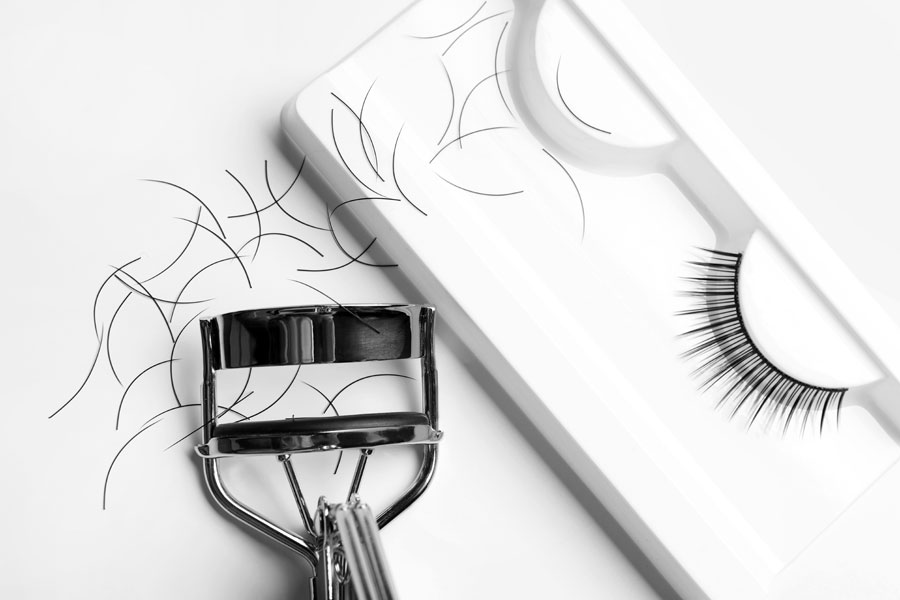
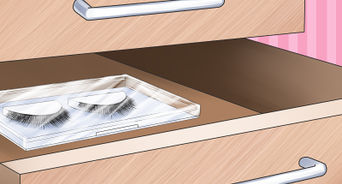
5. Revive Your False Lashes

Make the most of your false lashes by cleaning and storing them properly to get up to 20 wears from them.

6. Don’t Waste Your Foundation

Never apply your foundation straight onto a beauty blender or sponge, it will soak up all your foundation. Instead, dot it over your face, and spread it with your fingers or a foundation brush. Then, use your makeup sponge as the final step to perfect and blend your foundation, contour, or concealer.

7. Freshen Up Toiletries

Think you’ve finished your shampoo, conditioner or body wash? Add some water to it and give it a shake, you’ll get more than a few more uses from them.

8. Rescue Your Lipgloss

Revive your fav lip gloss with warm water. When it gets to the stage you’re literally scraping the barrel, just put the lip gloss in a glass of hot water (not boiling). The leftover product will sink to the end of the tube where the wand can reach it.

9. DIY A Unicorn Glow!

Got glitters you never use, outdated bronzers and shadows, broken powders? Smash them up into a fine powder and mix it with a moisturizer or coconut oil for a homemade tinted or shimmering moisturizer.

10. De-Clump Mascara

Mascara going dry and clumpy? Add a couple of eye drops into the mascara, mix about, and it will be good as new for another week at least. In a pinch, a drop of hot water will do the trick.

Hope these hacks revolutionize how you save your beauty products! If you’ve got any other amazing ideas, I’d love to know: leave your tips in the comments

9 Perfume Hacks That’ll Make You Smell Gorgeous ALL Day

If you were told that you’ve been applying your perfume wrong your entire life, you probably wouldn’t believe me. Just because it’s the way you’ve always seen it be applied – in countless movies, advertisements and inside every fragrance store – doesn’t mean it’s actually right. But if you’re spritzing your fragrance onto your wrists than pressing them together, you’re actually applying your perfume all wrong! By rubbing your skin together, you’ll disturb the top notes of the fragrance, which means it won’t last as long and the scent will be altered. Mind-blowing, right?

I know how much time, money, and effort it can take to find your perfect signature fragrance, so you really don’t want to waste a single drop. Here are nine hacks that’ll help your fragrance last, and keep you smelling hella fresh all day long. And for the record, just spray your fragrance and let it sink on your skin – whatever you do, DON’T DAB.

Here’s a quick debrief on the basics…

When it comes to fragrance one of the most important things to note (no pun intended), are the layers each perfume is made up of. Usually, every fragrance contains three notes, a top note, which is the first fragrance you smell (this disappears after 20 minutes), an intense middle note (known as the heart note), which becomes noticeable after 15 minutes, and a base note (the strongest scent) that lingers for up to four hours. Of course, this is all dependant on whether you follow any of the following hacks:

1. Moisturize first

Fragrances last longer when they’re applied to oily complexions, so make sure your skin is prepped and moisturized before you douse yourself in perfume. Just make sure you apply an unscented lotion, otherwise, the lotion will mix with the notes of your perfume and the scent will change.

2. Know where to spritz

If you apply your perfume to warmer areas of the body, it’ll be more intense and be fragrant for longer. More specifically, apply it to your pulse points – where the blood vessels are at the surface on your skin (your wrists, elbows, neck, chest, the back of the knees, ankles, and calves). Your pressure points naturally radiate heat, helping the fragrance evaporate from the skin.

3. Apply Vaseline To Your Pressure Points

As mentioned, perfume lasts a lot longer if you apply it to oily, damp skin. So I like to rub some Vaseline onto our pulse points as it helps to lock in the scent.

4. The lighter the scent, the less time it’ll last

Lighter aromatic scents like citrus or jasmine will evaporate faster as they have a smaller molecular structure, whereas scents like wood and musk will linger longer on your skin. It’s important to remember this when you’re purchasing a new scent.

5. Apply Your Perfume After You Shower

If you apply your perfume to your body when it’s still damp, the moisture will lock in the scent so it’ll last a whole lot longer – plus you won’t stain any of your clothes with spray marks!

6. Spritz Your Hairbrush

Spraying your brush with a couple bursts of perfume will disperse the scent through your hair. Your hair will retain the fragrance all day, but it won’t cause damage or drying like it might if you spray it directly onto your hair.

7. Make Your Own Lotion

To create your own signature moisturizer, put a couple drops of your perfume into an unscented lotion and shake well. You’ll basically be creating the scented lotion equivalent of your fragrance, but for a fraction of the cost – it’s a total bargain! Plus, it’s the ideal lotion to apply before you spritz, for long-lasting sweetness.

8. Décor Hack

Obsessed with this super easy hack, and it’s such a cute deco feature: Spray tissue paper with your fave scent and then line your drawers with the paper. It’ll make your clothes smell great, and you’ll be remembered for your signature scent everywhere you go!

9. Store your fragrance in a cool dark place

If you keep your perfume bottles in warm, damp places, the heat will damage the molecular structure and damage the quality of the fragrance. So make sure they’re not in the bathroom or in direct sunlight. Instead, keep them safely in the box in a cool dark place.

Let me know your favorite fragrance in the comments below!

Odds & Ends: The Difference Between Kosher Salt, Table Salt, Sea Salt, and More

I’ve always considered having options a good thing, especially in the kitchen. There are so many unique flavors to choose from, which makes cooking even more fun in my book. There are certain ingredients that can both overpower a dish or significantly amplify it. For me, salt is that ingredient. A pinch of salt can be the difference between perfectly savory or feeling like your crunching on a salt lick. The amount of salt you put into a dish isn’t the only things that can pose a potential problem though—with so many salt options on the market, how’s a girl to choose which one to use in a recipe?

Since I recently found myself asking the same question, I decided to do a little research. To my surprise, I discovered a handful of different salts suitable for cooking, brining and pickling. Some are used as flavor enhancers while other are used as garnishes or essential ingredients. If you’ve found yourself wondering which salt is best for your favorite dishes, I’ve done the dirty work for you. Below you’ll find six of the most common salts, what their composition is made of, and how you should be using them in the kitchen. Keep scrolling to get the lowdown on salt 101…

Kosher Salt

Let’s start with kosher salt. This salt is originally known for seasoning meat and has a flaky, coarse structure that differentiates itself from table salt. Kosher salt is less likely to contain additives like iodine and anti-caking agents used in table salt to keep it from clumping. This type of salt is ideal for using in cooking—it dissolves quickly and is good to use before, during and after cooking.

Table Salt

Probably the most well-known of the salts, table salt is highly refined, heavily ground and is almost pure sodium chloride. Most of the impurities and trace minerals in table salt are removed and iodine is almost always added into it. Like I mentioned above, table salt usually has anti-caking agents in it so that it doesn’t get all clumpy in your salt shaker. While you can still add this kind of salt into your favorite dishes, table salt is best used for last minute seasoning.

Sea Salt

Sea salt gets its name because it is made by evaporating seawater. Like table salt, sea salt is mostly composed of sodium chloride with some amount of trace minerals like potassium, iron and zinc. Sea salt is coarser than table salt and the size affects how quickly it will dissolve. To add bursts of flavor to your cooking, sprinkle a little sea salt to add the finishing touch to meals.

Himalayan Pink Salt

This next salt may sound a little bit familiar to my BeautyLeeBar.com readers. Himalayan pink salt contains 84 trace minerals and elements, making it more nutritious for your body that most other salts. It often contains small amounts of calcium, iron, potassium and magnesium just to name a few. Himalayan salt contains slightly lower amounts of sodium that table salt too, making it more appealing to consume. Fun fact: the iron oxide found in Himalayan salt gives it its pink color. Cook with Himalayan pink salt or sip some water infused with it after your next workout.

Fleur De Sel

This salt is one of my favorites and one that I became very familiar with while working on some new receipes. Fleur de sel is more delicate than other salts and looks like little snowflakes. This salt is not meant for seasoning a dish while cooking since it will melt and lose its soft, powdery shape. Because fleur de sel is the most complex in flavor of the different salts, use this one lightly. Sprinkle fleur de sel on food right before it is consumed since it is the saltier of salts.

Pickling Salt

Last but not least we have pickling salt. The name itself gives away what it is used for, but pickling salt is also great for brining, canning and preserving as well. Pickling salt is pure, granulated salt and does not contain anti-caking ingredients or iodine like table salt does.

After reading this, you’re now a guaranteed salt pro. Here’s to improving your cooking skills one grain of salt at a time.

Which one of these salts do you use most often?

Let me know your thoughts in the comments!

XO Lee

3 Reasons Why Green Tea Is SUPER Beautifying!

Hello Beauties, I’ve mentioned different types of tea in the past but I thought I would give more details about Green Tea. The importance and the effects of drinking Green Tea are so profound, that I wanted to share it as one! Hopefully you will all include a cup or two of green tea into your meals this weekend and enjoy the health and beauty benefits that can literally transform your skin over time!

Ever think sipping on something could actually make you more gorgeous inside out? I think we’ve all heard that green tea is a better alternative to coffee, but do we really know why? I actually stopped drinking green tea, but I for a while I was stuck on it and I noticed my skin felt sooooo much better while I was drinking it! Well, here are 3 reasons why we should all be drinking green tea! I know I will be drinking this again!

  • Green tea is Awesome for Weight Loss! For years models drank green tea making it trendy to drink, but they may actually be on to something! So many models claimed that drinking green tea actually made them slimmer! The facts are in–it has been scientifically proven that drinking green tea, increases our metabolism and helps us shed fat! Yup, making us slim up faster and much easier!
  • Green Tea is AMAZING for Skin! We all know antioxidants are great for skin and green tea is full of them, but what exactly are they for? Wellll, as we age, our skin cells begin to oxidize, which means they shrivel up, wrinkle and scar more easily—NOT FUN! Green tea is loaded with antioxidants that not only help prevent all of this from happening but actually help reverse skin damage! This will keep you young and fresh!
  • Green Tea is full of Vitamins! Of course, I am a firm believer of taking your vitamins, but there are days that I definitely skip! Drinking green tea is great not only for a ‘pick me up’, but also getting a good dose of vitamins! Green tea is packed full of vitamins A, C & E, which are ingredients that are necessary for gorgeousness inside out!